A long time in coming, and it took a long time to put it together. I've kept the commentary brief for the most part, but if you have any questions or want further explanation just ask.
Painting British Commandos
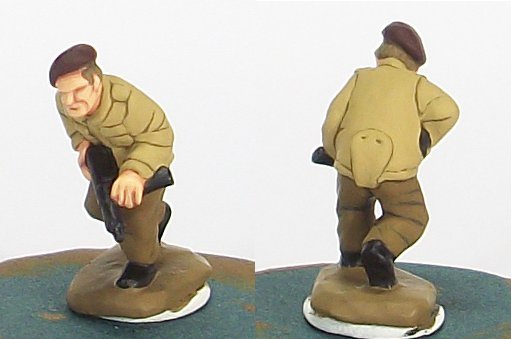
One of my favourite subjects from WW2 and my favorite army in Flames of War as well. Here I’ll be using a spare ‘Lord Lovat’ figure from the Battlefront Late War Commando blister (BR793) to illustrate a few points. This will be more for a ‘Late War’ feel: Normandy and the Orne Bridgehead, Walcheren, Wessel, etc., and is less applicable for earlier operations in the raiding era or in the Mediteranean. Commandos in earlier operations differed little in appearance from standard British Infantry, wearing standard Mk. II helmets and/or soft caps. Use of the green beret became more common from 1944 onward, being worn widely in Normandy and beyond in North-west Europe as well as by units operating in the Mediterranean. Apart from the beret, the other main differences include the Commando Bergen, the Fairbairn-Sykes ‘Commando’ Knife visible on the right leg of many figures and the increased number of Thompson SMGs.
I’ll keep the pictures and commentary brief here since the majority of the figure is similar to standard British infantry as illustrated in Part 1: the more unusual aspect will be explained a little more.
After an undercoat of Humbrol matt Black No. 33 I painted the flesh areas Game Colour Tan, then Dwarf Flesh. The Webbing was painted VMC Brown Violet as a shadow followed by a VMC Khaki block-paint. The uniform shadow was then applied in the form of VMC USA Olive Drab, this also being used to correct any mistakes around the webbing and also as the shadow colour for any wood. The centre part of the Bergen was painted the same colour, but the two side pouches were painted in ‘normal’ webbing colours. The famous Green Beret was painted VMC Black Green.
Flesh ares were then highlighted with VGC Elf Flesh, the uniform block-painted with VMC English Uniform, metal areas and boots P3 Black, wood with VMC Flat Earth and hair where visible with VMC German Camo Medium Brown (not really visible in these pictures but it is on the figures). The central parts of the Bergen were block-painted VMC Brown Violet, followed by a highlight of VPA Canvas
Highlights were then applied across the figure: VMC Khaki Grey for the Battledress, VPA New Wood for the rifle stock, VMC German Grey for the boots and the metal areas, the latter being further highlighted with VMC London Grey. The webbing was given edge-highlights of VPA US Tankcrew Highlight, this also being applied to the central parts of the Bergen to represent the ‘trimming’ visible in historical photographs. If doing an army however you might simply want to paint the whole thing the same as the webbing.
The Green Beret was highlight with a 2:1 mix of VMC Black Green and VMC Deep Green, followed by a 1:1 highlight of the same colours (the green really did not photograph well, a better example of the process being shown below on the Airborne beret). The vast majority of photographs show the Green Beret worn without any badges, so that would be preferable. The hair, though you cannot really see it here, had a few vertical lines of a VMC GC Med Brown & VMC Buff mix (2:1) applied. Lastly, the leather strap of the beret was carefully painted black, followed by a quick highlight of VMC German Grey.
For more detailed explanations on certain details, see Part 1 of the guides.
Painting British Airborne
Airborne. As in ‘borne by air’, not bloody ‘Airbourne’ (yes…the ‘Airbourne Identity’….uh, no). Get it right.
I digress. British Airborne divisions were comprised of bother Parachute and Glider troops during the war, there being little visual difference between the two and even less in 15mm. Bother Parachute and Glider troops wore the famous Denison Smock, the Red/Maroon Beret and the rimless British Airborne helmet. The main difference between the two (in terms of appearance) will be in marking and beret badges. Here I’ve gone for a basic guide without markings, etc., as I used on my previous British Airlanding Platoon. Also, since the Denison Smock proved difficult to photograph properly on Battlefront’s very cartoony sculpts, I’ve employed a modified ‘bailed-out’ tank crew figure to illustrate the process. Webbing and other colours largely follow those used previously.
In the first picture the initial flesh work has been done as before. The Denison Smock has been coated with two thinned coats of VMC English Uniform. The standard Battledress trousers are painted as normal, while the beret was painted with VMC Black Red + a bit of black. The hair was painted VMC GC Medium Brown.
In the second picture you can see the hair more clearly, here with a few simple vertical highlights applied. The Denison Smock was block painted with VMC Green Ochre, leaving the English Uniform to provide definition around pockets, joins and a few major folds. Two slightly thinned coats of the Green Ochre are usually needed. Note that I’ve used a much lighter colour than the ‘real thing’: in my view it is pointless painting camouflage on 15mm figures if after you’re done you can see barely anything. In this scale, definition is your friend.
The real work begins. I usually start with the brown camouflage first, applying ‘swatches’ of the brown colour, here VMC German Camo Medium Brown as a shadow colour. I’ve painted jagged edges in an attempt to recreate the ‘Airborne Smock Denison Camouflage’ pattern which was initially applied by brush for its distinctive look, though the later manufacturing process maintained the same style. Even a few jagged edges will prevent the pattern from looking ‘blobby’.
After the brown shadow colour, a green shadow was applied in a similar manner, this time with VMC German Camo Dark Green.
The beret was painted for a very smooth look: after the initial VMC Black Red & black mix, a 1:1 mix of VMC Black Red and VGC Scarlett Red was applied. A final highlight of pure VGC Scarlett Red was then applied, leaving a ‘head impression’ on the top to add a bit of detail and interest (if any of this makes any sense…). Lastly, the leather strap of the beret was carefully painted black (helping to define the face and beret, as well as separate them) followed by a very thin VMC German Grey highlight to break the stark black colour.
Since this figure was part of an extra base to be added to the previous Airlanding platoon and I had left off badges on their berets, I left off any markings here as well. Feel to add the Royal Parachute Regiment badge or one from the various Airlanding Battalions on your figures berets.
For helmets, I paint an overall coat of SCC15 (Part 1 for recipe), wash with black, then dry-brush SSC15 again followed by a lighter variant: the bits of scrim are then picked-out in choice colours. I didn't take any pics of this, but there are
a few old work-in-progress shots which might be useful.
Lastly, the camouflage was highlighted, the brown with VMC Flat Earth, the green with VMC Luftwaffe Green. A fine line is left of the shadow colour to give extra definition, but the overall effect is still very soft.
If you happen to have a whole army clad in Denison Smocks to paint rather than my single platoon, I’d suggest skipping the ‘shadow’ colours for the camouflage and simply apply VMC Flat Earth for the brown and VMC Luftwaffe Green for the green. Unless, like me, you're a sucker for punishment...
CdlT