Thursday 27 September 2018

Op Battleaxe - Game 5: Second British Attack on Point 208

Game 5 of the Operation Battleaxe campaign saw the second British attack on Point 208/The Hafid Ridge.


*spoilers* It went even worse than the first attack.

This time the British force would be a mixed Cruiser tank squadron from 2 RTR, mixed A10s and A13s with an A9 CS tank. The German defenders would be much the same as last time, with the added reinforcement of armour arriving from reserve.

German position, from the flank the British would attack.


British deployment: subtle, isn't it?

A10s and an A13 move forward, the latter is KO'd almost immediately by the PaK38.

British fire on the PaK38 causes a couple of crew casualties, the 88 returns the fire and KO's the A9 CS tank.

The British finally eliminate the PaK38, but lose an A10, and then suffer heavy casualties as the 88 destroys two more A10s. The first wave has been decimated.


British reinforcement arrive to a poor situation: A13s and more infantry.

The Germans too revive reserves, though they are hardly be needed.

A13s advance into the cauldron only to slowly be picked off one by one for little result. The 88 takes a few crew casualties, but the crew holds firm and keeps firing.


The Germans are even cheeky enough to launch a flanking attack with just one Panzer III...which works.

The British morale breaks as their tanks losses are almost complete for very few gains.


A very one-sided game, but one which does illustrate the futility of attacking a prepared position without sufficient fire support or anything remotely resembling a "plan". Poor dice rolling simply added salt to the wound.

CdlT

Sunday 23 September 2018

US Chaffee Platoon

A platoon of 15mm Chaffee light tanks. Battlefront miniatures: AAMG .50cals replaced with the far superior plastic versions, other than that pretty much out-of-the-box.


CdlT

Thursday 20 September 2018

Op Battleaxe - Game 4: British Attack on Fort Capuzzo

The second turn of the Operation Battleaxe Campaign saw the British launch three attacks, on Point 208. on Fort Capuzzo, and on Musaid. For Game 4 of the campaign we played the British attack Fort Capuzzo with the 7 RTR Group.


The Germans had not been idle however: Point 206 had fallen and Rommel, now assured that a major British attack was underway, has released the Panzer units to counter British moves. A Panzer Battalion has moved to reinforce the motley defenders in the Ft. Capuzzo territory.


Fort Capuzzo: the German left.

The German right.

British Vickers light tanks scout ahead, intent on causing mischief.

A Matilda and some infantry probe forward.

The Vickers round the corner of the tower and spray MG fire, inflicting a casualty on the German HMG. The Germans respond with a moving PaK38 shot with KO's a Vickers, and an AT Rifle shot (two men by the wall) which hits but fails to damage the second Vickers.

Clearly sensing the danger they are in, the second Vickers rolls a BTCOD test and promptly guns-down the AT Rifle team with one burst and inflicts a casualty on the PaK38 with the second.

On the British right, more Matildas trundle forward but do little damage.

The Vickers lets rip once more, eliminating the PaK38! Infantry race forward in support.

The re-deployed PaK36 exchanges fire with the lead Matilda and successfully immobilises and pins it with a luck shot.

The Vickers prepares to enter the fort, while the German HMG has just evacuated to the rear of the fort, straight into a 25-pounder shell...

With infantry now in support, the Vickers prepares to move forward but is pinned by small-arms fire...

...and the Panzers have arrived! But they only hit the Vickers once, and the armour somehow holds!

With their tank pinned, the two lead sections both launch close assaults into the fort...the first kills two men from the German Forward HQ, but crucially one man survives! The second assault eliminates the German LMG team, but with heavy losses: the British section takes their wounded and withdraws.

On the right, Matildas still exchanged fire with the PaK36, successfully eliminating it,
then killing one man on the PaK38 and pinning it.

Panzers Marsch! A platoon of five Panzer III G arrives to stabilise the line.

Matildas lead,with Carriers coming up behind and infantry on foot following: but the advance is glacial as British reserves have come on very slowly. Sporadic German artillery fire pins a few things.

A second wave of attackers, lead by a Matilda troop, advances on the British right.

Panzer III Gs....hide. For now.

The pinned Vickers is finally KO'd by the Panzer IIIs, who then re-deploy behind the fort.


The German FHQ, down to one man, decides to re-locate to the rear of the fort, but unfortunately walks into a 25-pounder stonk which eliminates him and a Panzer III!

The Germans draw two chits for the FHQ...both Beyond the Call of Duty chits! Played on the PaK38, their effect is mediocre as they only manage to pin an advancing Matilda.

With one Matilda pinned and another immobilised and pinned, the Panzer IIIs move to engage, successfully rolling equal on the nearest Matilda: Pinned, followed by a roll of 1 sees the crew fail morale and abandon it! A Panzer III is then Immobilised by a Breakdown chit.

One Matilda successfully enters the fort, but is suppressed by small-arms fire.

The other moves to engage a Panzer III: on Ambush fire, the Panzer fires first but the hit is deflected and the Matilda crew promptly KO the Panzer!

The British attack on their left finally gets going, but it's really too late. The PaK38 pins the mobile Matilda and KO's a Universal Carrier, which see the British force morale fail.


The dice hated the British players...they rolled poorly when it really mattered, far too many 1s and usually at the worst possible time. Early attempts to un-pin were extremely unsuccessful, unpinning just one or two units each time for a significant BR loss. Reserves came on in one and twos for several turns, Arty comm checks were terrible the first few turns and the left side attack just never really got going. Despite this they managed to inflict a fair few losses on the German defenders, but the BR losses eventually caught up on them faster than their opponents.

With the attack repulsed, the next game will be the second attack on Pt. 208/Hafid Ridge: another tough ask, but where a solid win is sorely needed for the British side, and where the DAK must hold to keep their flank secure.

CdlT

Saturday 15 September 2018

WIP: 4 RTR Desert Matildas

Battlefront models, built here for the desert. I'm aiming to do 'A' Squadron, 4th Royal Tank Regiment during Operation Battleaxe. Little did I know what this would entail...

The initial build:


Though period pictures of Matildas don't show masses of stowage, they do show some and I have tried to add different pieces to make each tank unique without going overboard (!) or being inaccurate. I always try to work from pictures to make sure each piece is authentic and will seldom add something "just because": I really do want a reference pic for each addition.


Thus I've added just a few pieces per tank, but enough to add some interest. The gun barrels were replaced with plastic ones; towing cables added with thick-ish bits of cotton; bed rolls and tarps with green stuff/grey stuff and some bits added from the PSC German stowage set (rolled bed-rolls mostly). I cast a few Mk. II helmets in milliput/GS and added those to the side of turrets and a few other places. I added some sandbags to one tank after seeing a picture of them: this also helped to hide the poor casting on that model. Thanks Battlefront, as usual.


Necessary for the Operation Battleaxe campaign I'm running, I needed these done sharpish and worked on all six at once...fun.

Inspiration...


Drake would be the model for markings, while the pattern would follow Phantom (detailed below)


Painting Caunter Camouflage (aka "Abandon All Hope Ye Who Enter Here")

"There are two types of people in this world: those that paint the Caunter Scheme, and the filthy casuals..."

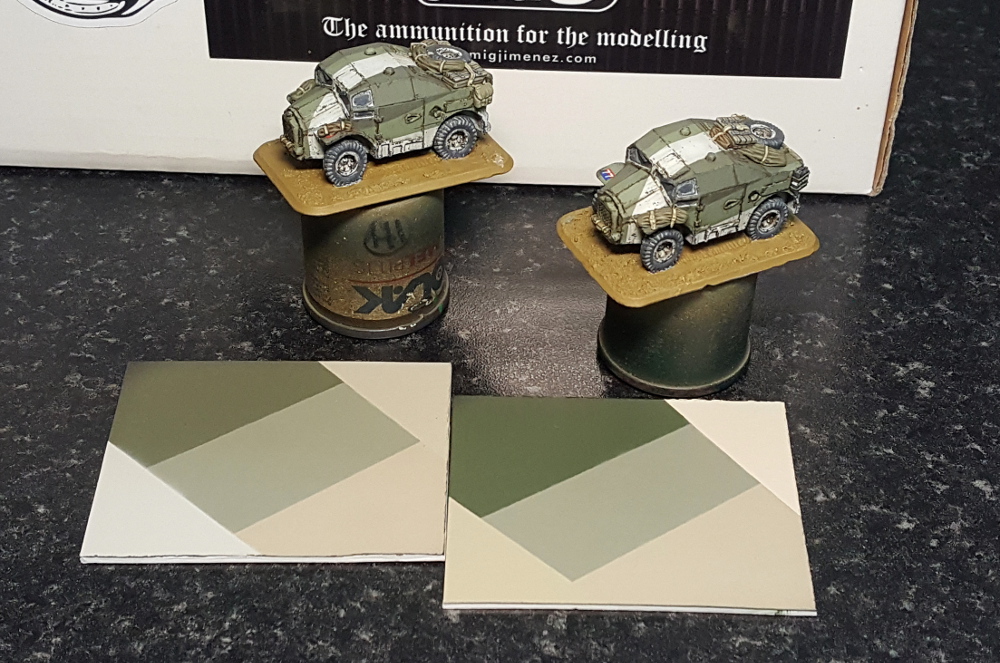
The Caunter Scheme. Fun. Tests ensued...

Early Portland Stone with VMC Ivory...too light.

On the Matildas, I went with the following colours:

BSC No. 34 SLATE: VMC 888 Olive Grey
BSC No. 28 SILVER GREY: a 1:1 mix of Vallejo Panzer Aces 318 US Tankcrew and VMC 885 Pastel Green.
BSC No. 64 PORTLAND STONE: Airbrushed Vallejo Surface Primer German Green Brown, followed by MiG-011 Dunkelgelb I and MiG-012 Dunkelgelb III in a rough modulation style (yes really). Most of it was covered by the disruptive colours.

The Primer/Portland Stone was applied first (by airbrush) then (by brush) the Slate and finally the Silver Grey

I'm not entirely happy with any of them, but I neither the time nor the coin to start ordering paint sets, so damn the torpedoes and full steam ahead.

Ah, but wait, the pattern...


I ended up using the article in Military Modelling Vol. 40 No. 02 (2010) by Mike Starmer on pp. 58-60, as well as the reference plates from the (now defunct) Armoured Acorn. See also the magazine "Model Military International, Issue 141, January 2018" for a lovely example applied to an A10 Cruiser. 

I aimed more for the pattern on Phantom above, as Drake was supposedly painted in a non-standard pattern (groan...). I then muddled through finding that some compromises had to be made on a (somewhat cartoony) 15mm model. 

Still with me? Das dicke ende kommt noch...


On to painting: I worked on a single model, attempting to replicate the pattern as accurately as possible on that model, before using that model as a template for the other five (rather than referring constantly back to pictures of the pattern). Starting with the Slate colour, I carefully painted the outline of the bands before "filling in" the colour. 2-3 thin coats were applied for proper coverage, by brush obviously. Old school.


With the Slate colour done, I moved onto the Silver Grey and did much the same.


From there I went on to apply decals,  paint the white/red/white identification stripes on the front of the hull and then do chipping, a mix of sponge chipping and (mostly) brush-painted chipping: this really helps to add "noise" to the pattern which looks far too clean without it. I then painted the stowage and all the other required detailing (no pics here but it's much as with other vehicles I've done recently).


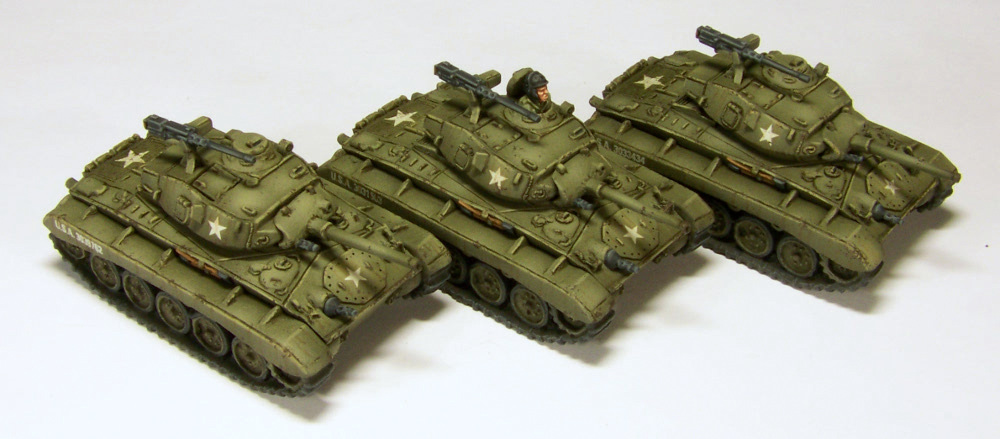
Presently the Matildas, along with the Vickers, are done except for the tank commanders: when added I'll take proper pics, but for now they look like this:


The colour difference on the Vickers is because they were done earlier and I used VMC 893 US Dark Green as the colour for Slate: unhappy with that (it's not green enough, though OK for a faded Slate colour), I used the Tony Barton suggestion of VMC 888 Olive Grey for Slate on the Matildas. It works better, and while the colours are to my mind within an acceptable range, they are not exactly "spot on".


If you plan on painting the Caunter Scheme camouflage, do yourself a favour and buy a paint set, e.g. AK Acrylics or AK Real Colours. It will save a great deal of experimentation and headache.

Unless you're like me. "We're all mad here..."


CdlT
Related Posts Plugin for WordPress, Blogger...