Showing posts with label Painting Guides. Show all posts

Wednesday, 22 April 2015

Painting Field Grey


Not the Panzergrenadiers you were looking for...

There are many ways of doing this, this is merely the one I use.

I've kept the commentary short since the actual painting process follows the way I usually do it, though some colours have changed e.g. flesh colours. Rather than skip ahead, the picture sequence shows each stage (roughly), warts and all.

Colours are VMC (Vallejo Model Colour) unless noted. The figures are from Battlefront's GE780 Lehr Panzergrenadier Platoon since they're not so cluttered with equipment and camo smocks, etc..

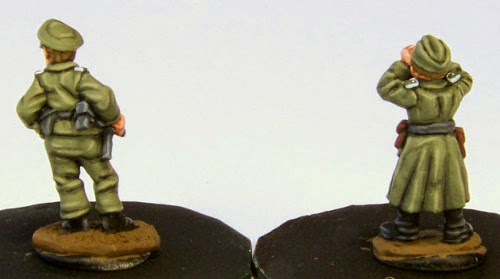
Black undercoat (front)

Black undercoat (rear)


Flesh Shadow with P3 Idrian Flesh.
Helmet covers with 988 Khaki.
SMG Pouches, Bread Bag and Ammo Box with 887 Brown Violet.
Wood and brown leather with 889 USA Olive Drab.

Rear shot of above.


Flesh with P3 Khardic Flesh.
Helmet Covers with 884 Stone Grey.
SMG Pouches and Bread Bag with 886 Green Grey.
Ammo Box  882 Middlestone.
Wood with 984 Flat Earth.
Uniform with 3:1 Mix of 830 German Fieldgrey & Black.


The colours of the actual Field Grey uniform are quite simple. I paint the figure with a quite dark shadow colour, a 3:1 mix of 830 Fieldgrey and black, then block-paint with pure Fieldgrey. An overall highlight with a 3:1 mix of 830 Fieldgrey and 886 Green Grey, followed by edge highlights and definition lines with pure 886 Green Grey.


Flesh with P3 Midlund Flesh.Webbing/Black leather with Black.
SMG Pouches and Bread Bag with 886 Green Grey + 884 Stone Grey, mixed 1:1.
Uniform with 830 German Fieldgrey.
Weapons and metal 950 Black.
Brown Leather with 984 Flat Brown.


Fieldgrey painted equipment, e.g. bare helmets, gas canister and the like are painted similarly to the Fieldgrey uniform but with a mix I made: 1:1 mix of 830 Fieldgrey and 979 German Camo Dark Green. This is painted exactly like the FG, but using this "Fieldgrey-Green" mix, same 3:1 mix with 886 Green Grey for highlights, then 1:1 with Green Grey for more definition if needed. It simply results in a "greener" finish that complements the browner Fieldgrey uniform.


Flesh with P3 Ryn Flesh (nose, cheek bones, around the mouth,,  fingers, etc.).Webbing/Black leather with 995 German Grey.
SMG Pouches, Bread Bag: 886 Green Grey + 884 Stone Grey, mixed 1:1.
Ammo Box: add White to 882 Middlestone until satisfied.
Wood: Panzer Aces 311 New Wood.
Uniform: 3:1 Mix of 830 German Fieldgrey & 886 Green GreyWeapons and metal 995 German Grey.Brown Leather with 846 Mahogany Sand.
Splinter as per usual (different base colour here though).


The use of 886 Green Grey for line and edge highlights adds a lot of definition to the figure and allows certain areas to be emphasised. For instance, on these Panzer Lehr Panzergrenadier figures, the "Panzer Wrap" nature of the uniform can be emphasised with some well-placed highlights on the uniform collars, giving a lot more definition than usual. Sharp highlights also indicate the close-fitting nature of the uniform quite well.

Webbing/Black leather with 867 Dark Bluegrey (pick out edges).
Uniform with 886 Green Grey for edge and line highlights.Weapons and metal Coat 'd Arms 212 Dark Grey, then 836 London Grey.


The MG belt was a simple NMM-style caricature, i.e. brass casings and metal bullets, not designed to look like the actual thing but how one "thinks" an MG belt would look.


The NMM brass sections were painted with a dark brown, then each "bullet" was picked out with Vallejo Game Colour Leather Brown, the high-lighted by mixing VGC Leather Brown with VMC Pale Sand 1:1. The "bullets" were done similarly: Black, then VMC 995 German Grey, then VMC 836 London Grey. It's a pretty simple approach that looks decent enough on 15mm miniatures and certainly makes the MG-belt stand out.

Similar approach as above on the figures below:


Of course I miss-placed the final pics on bases, but the above pretty much explains how I do it.

CdlT


Friday, 17 May 2013

Painting (Heer) Splinter Camouflage

Someone asked me to explain a few months back (by e-mail) how I was painting splinter camo on 15mm figures. So a few pics & text = short tutorial of sorts. I might as well post it here too.

Painting Splinter camouflage on 15mm figures can be quite challenging but, with a little practice, is not nearly as difficult as it would appear. The way I paint it has been fairly similar for a few years now: the design painted on General von Sauken is very similar to that on the Volksgrenadiers, for example. I say "Heer" Splinter ("Splinter A") as I tend to paint the Luftwaffe variant ("Splinter B") a little differently. But that is just a personal choice: the pattern below is perfectly fine for Luftwaffe Splinter since on a 15mm figure we are not really painting actual Splinter camouflage, but rather a representation thereof.

Note the slightly different patterns: Luftwaffe on left, Heer on right.

A simple way to paint basic Splinter camouflage is shown by Evan Allen on the main Battlefront/Flames of War site. This was the method I used some years back on my old Luftwaffe Jaeger Platoon. It is fairly easy to do and does a pretty good job of representing the camouflage. Of course, I've improved a little since then, so I started looking for something a bit more involved. The Battlefront guide in the Art of War II (p. 27) had a decent guide, and the way I do it is pretty much based on that.


I'll be using (mostly) the Panzer Aces Splinter colours as they are nice and bright, something needed on small 15mm models: darker colours stand out less, making the camouflage that much more difficult to see. Dodgy pics as standard...

I start with a coat of P3 Cryx Bane Highlight as a shadow for the Splinter Base. A mix of VPA Splinter Base + a little Field Grey works well too. (As an alternate, as I used on the Volksgrenadiers, is a shadow of VMC Khaki and a base colour of VMC Stone Grey: this is a somewhat "warmer" base, but the end result is also very good.)

After that, I block-paint with VPA Splinter Base. I tend to leave only a few shadow lines; leaving too many will make them visible later which will add more "noise" to the pattern. Just a few lines for definition works fine.


After the base colour is done, I paint in brown camo lines with the VPA Splinter Brown colour. VMC German Camo Medium Brown is very similar and I have used this as well many times. Since we are not painting the actual thing, I try to suggest what the camouflage should look like. Keeping the lines/edges as straight as possible helps in this regard. I also initially paint over the belt, etc. trying to keep the pattern "coherent": the belt and other equipment details are picked out later.

Brown Camo


That being done, I add in the green splotches with VPA Splinter Green. Placing these so they look "correct" is still something I have difficulty with: looking at the real thing only helps so much. Again, I try to keep the edges of the patches as straight as possible, and not to add too much green.

Green patches added


Lastly, I paint fine lines (aka "Splinters") in groups of 2-3 lines on areas where the base colour is showing through. I used Panzer Aces 348 "Splinter Strips" here, but any sort of dark-to-medium green-grey will work just as well since the lines are very fine. This is not strictly necessary, and of course is well out of scale, but I like the effect. Remember to keep the lines in one direction, as on the real thing.

Camo done

Cleaned up with black

After that, the rest of the figure was completed.


For figures wearing helmet covers, the process is much the same. The helmet covers were made from several pieces of camouflaged fabric sewn together, but I tend to ignore this fact in this scale and just paint. However, I add the splinter lines at different angles to suggest different pieces, plus it just looks better.
Helmet cover, made from several pieces sewn together

Splinter Camo on a helmet cover


Hermann Göring Panzergrenadier, tutorial figure, Panzergrenadier, Fallschirmjäger

On the figures above, you can see the difference between the Splinter Base used on the two figures on the left and the warmer tones of VMC Stone Grey (over Khaki) used on the right. Both variations can be used in the same force without difficulty. Adding darker base colours can also add variation, although from 3 feet away the difference will be minimal.

CdlT

Thursday, 18 April 2013

Painting "Clean" Vehicles - A Primer & Short Tutorial

Just a quick post, really a primer for a longer tutorial that will follow. Soon. Next week. By Christmas. Etc.

The idea here is to show a basic step-by-step of how I have painted vehicles in the "clean" style in the past. I say "in the past" because I am moving away from this style of painting, but I've had enough requests over the years to make doing a tutorial worthwhile. The pics are not very good, but this really is a stop-gap, just meant to explain the basic process: I intend to follow this article up with another where I'll paint a British Challenger tank from start to finish to match this painting style. It is much easier to see the effect on the "real thing" than on this small example. Still, painting panels in such a manner is good practice.

I've used a spare piece of plastic BF Panzer IV shurzen here: undercoated black, I then painted it with an overall thinned coat of VMC 888 Olive Grey.
A single coat of Olive Grey. Note patchy coverage.

I then "pin washed" the panel lines with Army Painter "Dark Tone" Wash, (i.e. Badab Black or whatever they're calling it these days: see link HERE for comparisons). Thinned black paint or similar will also work, but a matte finish is a must. This is not a real "pin wash", basically I just paint it where the details are to darken and define them.

Black wash applied on panel lines.

I then follow this up by painting another, thinned, coat of VMC Olive Grey. Below I have left the panels to the left and right of the centre panel alone with only one coat of paint. You can readily see the difference, the second coat adds a level of intensity to the colour that a single coat lacks.


The idea here is to "block paint" i.e. to carefully paint up to the lines without messing into them. This is a achieved by (1) brush control (2) thinned paint, but not too thin (about 1:1 paint water for me), and (3) by not loading the brush with too much paint which, if done, will result in control being lost and the excess paint running into the details. Less is more, as the saying goes.  

Light playing tricks here, still Olive Grey overall.

After an overall coat of Olive Grey, I apply the SCC15 mix: a 1:1 mix of VMC 888 Olive Grey and VMC 924 Russian Uniform. This is a sort of "overall highlight", in other words I apply it over most of the previous colour, leaving some of the Olive Grey showing at the edges. This is how the "soft, smooth" look is achieved in part: thinned layers of paint helps too.

Being applied in this way, the colour will, again, show a level of intensity which other methods (e.g. airbrushing) will lack, but this is neither here nor there, just different. Again, I have a left a panel in Olive Grey to show the contrast. Note the edges of the painted panels where the SCC15 colour is painted close up to them but not all the way.


Once the entire thing is done, it is time for edge highlights. The theory here is, obviously, to highlight selected edges with a much lighter colour which will define details and edges and cause them to "pop" or stand out, especially from 3 feet away on the gaming table. These I applied on the shurzen on the "top" parts, a bit difficult to make out below. I highlighted the tops of the centre panels and the top and sides of those panels on the edges. I did not paint lines down the centre of the panels as this would essentially be wasting the previous effort: "framing a green box". I used the Vallejo Panzer Aces colour 327 Italian Tank Crew: this is just like adding a light grey to the SCC15 mix, but is more convenient being straight from the bottle. 


That is pretty much it for the theory: I struggled to demonstrate this on something simple, it should be clearer on an actual vehicle I think. However, the basic process remain the same.

Theory next to practice.


(the rest)

I'll keep this short, as I'm bored of it and the process did not photograph very well with my lack-of-photography-skills.


I've used two different models here to speed things up, but left them free of stowage, etc. for simplicity and to see what is happening. I worked from an overall black undercoat, then base-coated the entire model with VMC 888 Olive Grey with and airbrush, though in the past I've used a flat brush to quickly get some colour on the model. 

Black undercoat

Overall VMC 888 Olive Grey

I did the tracks fist for simplicity. I painted the tracks black, then dry-brushed them quite heavily with VMC 995 German Grey, followed by a lighter dry-brush of a gunmetal (any will do). With the gunmetal I attempt to highlight the areas of the track in contact with the ground that would see the most wear and show as bare metal. 


After that, I painted the inside of the road wheels with the SCC15* mix and gave them an overall (thinned) wash with Badab Black/Army Painter Dark Tone "Ink" (it's not an actual ink, it is an acrylic wash). I then picked out the rivets and prominent points with SCC15* again, as well as the rim. Rubber was painted black, I didn't bother with grey highlights here as the matt varnish toned it down considerably. Panzer Aces Dark Rubber or similar is a good colour to use. I finish by gloss varnishing. With tracks and running gear out of the way, we can get to some actual painting.


With the tank being an overall shade of VMC 888 Olive Grey, I start by "lining" the details with black wash, that is, I paint the wash into areas where there is detail. The picture-sequence of the hulls pretty much shows what I mean. I've included pictures of the turrets, the process is the same.
Olive Grey on left, right with wash "lining" applied.


After that I "clean up" by block-painting again with Olive Grey, leaving the black line where appropriate. You'll note that the new coat of Olive Grey is "greener" than the airbrushed coat, since it is applied by brush and the colour is consequently more opaque.
"Lined" tank left, block painted tank on right.


Next, I paint the SCC15* mix, leaving some of the Olive Grey showing around the edges in places, while pushing it to the edge of panels in other places. See the picture for example. 
Olive Grey on left, SCC15 applied on right.


Lastly, I use line highlights to emphasise the edges, with Vallejo Panzer Aces 327 Italian Tankcrew. I also highlight the top of various ridges, rivets, and so on.
SCC15 on left, edge highlights on right.


The turrets follow the same idea.


Side-shots of the hull progress.


Lastly, I finish by painting other details (tools and equipment), gloss varnishing, applying decals, and the matt varnishing.


Finished vehicles.


This is the old way. I did my Cromwell-based force this way, but I'll be doing a Sherman Squadron with different techniques in future.

CdlT

* The SCC15 mix is a 1:1 mix of VMC 924 Russian Uniform and 888 Olive Grey.


Related Posts Plugin for WordPress, Blogger...