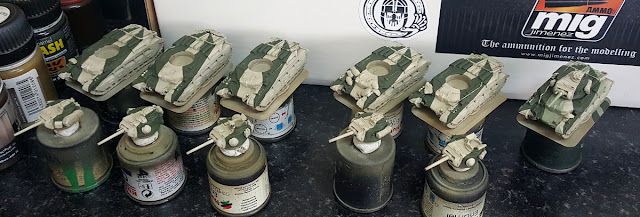
The initial build:
Though period pictures of Matildas don't show masses of stowage, they do show some and I have tried to add different pieces to make each tank unique without going overboard (!) or being inaccurate. I always try to work from pictures to make sure each piece is authentic and will seldom add something "just because": I really do want a reference pic for each addition.
Thus I've added just a few pieces per tank, but enough to add some interest. The gun barrels were replaced with plastic ones; towing cables added with thick-ish bits of cotton; bed rolls and tarps with green stuff/grey stuff and some bits added from the PSC German stowage set (rolled bed-rolls mostly). I cast a few Mk. II helmets in milliput/GS and added those to the side of turrets and a few other places. I added some sandbags to one tank after seeing a picture of them: this also helped to hide the poor casting on that model. Thanks Battlefront, as usual.
Necessary for the Operation Battleaxe campaign I'm running, I needed these done sharpish and worked on all six at once...fun.
 |
| Inspiration... |
Drake would be the model for markings, while the pattern would follow Phantom (detailed below)
Painting Caunter Camouflage (aka "Abandon All Hope Ye Who Enter Here")
"There are two types of people in this world: those that paint the Caunter Scheme, and the filthy casuals..."
The Caunter Scheme. Fun. Tests ensued...
 |
| Early Portland Stone with VMC Ivory...too light. |
On the Matildas, I went with the following colours:
BSC No. 34 SLATE: VMC 888 Olive Grey
BSC No. 28 SILVER GREY: a 1:1 mix of Vallejo Panzer Aces 318 US Tankcrew and VMC 885 Pastel Green.
BSC No. 64 PORTLAND STONE: Airbrushed Vallejo Surface Primer German Green Brown, followed by MiG-011 Dunkelgelb I and MiG-012 Dunkelgelb III in a rough modulation style (yes really). Most of it was covered by the disruptive colours.
The Primer/Portland Stone was applied first (by airbrush) then (by brush) the Slate and finally the Silver Grey
I'm not entirely happy with any of them, but I neither the time nor the coin to start ordering paint sets, so damn the torpedoes and full steam ahead.
Ah, but wait, the pattern...
I ended up using the article in Military Modelling Vol. 40 No. 02 (2010) by Mike Starmer on pp. 58-60, as well as the reference plates from the (now defunct) Armoured Acorn. See also the magazine "Model Military International, Issue 141, January 2018" for a lovely example applied to an A10 Cruiser.
I aimed more for the pattern on Phantom above, as Drake was supposedly painted in a non-standard pattern (groan...). I then muddled through finding that some compromises had to be made on a (somewhat cartoony) 15mm model.
Still with me? Das dicke ende kommt noch...
On to painting: I worked on a single model, attempting to replicate the pattern as accurately as possible on that model, before using that model as a template for the other five (rather than referring constantly back to pictures of the pattern). Starting with the Slate colour, I carefully painted the outline of the bands before "filling in" the colour. 2-3 thin coats were applied for proper coverage, by brush obviously. Old school.
With the Slate colour done, I moved onto the Silver Grey and did much the same.
From there I went on to apply decals, paint the white/red/white identification stripes on the front of the hull and then do chipping, a mix of sponge chipping and (mostly) brush-painted chipping: this really helps to add "noise" to the pattern which looks far too clean without it. I then painted the stowage and all the other required detailing (no pics here but it's much as with other vehicles I've done recently).
Presently the Matildas, along with the Vickers, are done except for the tank commanders: when added I'll take proper pics, but for now they look like this:
The colour difference on the Vickers is because they were done earlier and I used VMC 893 US Dark Green as the colour for Slate: unhappy with that (it's not green enough, though OK for a faded Slate colour), I used the Tony Barton suggestion of VMC 888 Olive Grey for Slate on the Matildas. It works better, and while the colours are to my mind within an acceptable range, they are not exactly "spot on".
Unless you're like me. "We're all mad here..."
CdlT


Very nice work. I tried Caunter on an early Honey, but I'm not happy with the colours. This is it before weathering.
ReplyDeletehttps://4.bp.blogspot.com/-TzJVl8gbtMg/WlaqnRk6sxI/AAAAAAAADok/3DF9WDu7aXkxvdXvf85cmjrjgPP9KmXOQCLcBGAs/s1600/colours.png
Thanks Doug: Caunter colours are indeed one of the more difficult I've encountered. I'm still not entirely happy with my choices, but I see it as an iterative process, hopefully working toward a better result with each completed platoon of vehicles. That is already visible in the colour change from the Vickers to the Matildas. But still, it's a tough scheme.
DeleteCdlT
Fantastic, and I wouldn't sweat the colours... in that heat and dust any dark colour will start fading within weeks if not days... for my desert forces I went with a plain sand colour, couldn't face the idea of caunter! LOL!
ReplyDeleteCheers Steve. Plain sand becomes increasingly attractive the more Caunter one paints...but Caunter is iconic for the period, so I had to at least try.
DeleteCdlT
Looking great, as usual!
ReplyDeleteLook superb
ReplyDeleteThanks for sharing these... just working on some larger Matilda IIs for Bolt Action and looking for inspiration. These were very helpful!
ReplyDelete