Guide to paint codes:
VMC = Vallejo Model Colour
VGC = Vallejo Game Colour
VPA = Vallejo Panzer Aces
VMA = Vallejo Model Air
P3 = Privateer Press Formula P3 Paints.
Below are the paint combinations I use when painting British infantry: they are applied mostly ‘as is’, i.e. no intermixing unless noted. However, if a highlight colour provides too much contrast for your liking, mix in a bit of the colour listed above it.
Flesh Areas
Shadow: VGC 066 Tan
Base: VGC 041 Dwarf Skintone/Flesh
Highlight: VGC 004 Elf Skintone/Flesh
Webbing
Shadow: 887 Brown Violet
Base: 988 Khaki
Highlight: 322 US Tankcrew Highlight
Battledress Uniform
Shadow: 889 USA Olive Drab*
Base: 921 English Uniform
Highlight: 880 Khaki Grey*
*Note: If you’re painting larger scale figures (e.g. 28mm) using something similar to the ‘Foundry/3 layer method’ then this will be too dark. I prefer a slightly darker colour as I don’t leave black visible in 15mm. In 28mm you might use VMC Burnt Umber, Chocolate Brown or Leather Brown as a Shadow colour. Similarly, tone the webbing down in 28mm: in 15mm I exaggerate so small details are more visible.
**Other options here include 879 Green Brown and Vallejo Panzer Aces 317 English Tankcrew.
Boots
Shadow: VMC 950 Black
Base: 995 German Grey
Highlight: VPA 306 Dark Rubber/P3 Greatcoat Grey
Metal (on weapons, tools, etc.)
Shadow: VMC 950 Black
Base: 995 German Grey
Highlight: 836 London Grey/GW Codex Grey
Canteen
Shadow: 889 USA Olive Drab
Base: 983 Flat Earth
Highlight: 50/50 983 Flat Earth and 884 Stone Grey/Ivory, etc
Scrim on helmets
Base: VPA 314 Canvas
Highlight: 998 Khaki
Wood (Rifle & entrenching tools)
Shadow: 889 USA Olive Drab
Base: 983 Flat Earth
Highlight: VPA 311 New Wood
SCC15 Variation I (Helmets & painted equipment, 1944-45)
Shadow: 888 Olive Grey and a bit of black.
Base: SCC15 Green*** (50/50 mix, 888 Olive Grey and 924 Russian Uniform).
Highlight: VPA 320 French Tankcrew.
*** SCC15 was the standard British colour used from April 1944 onwards for tanks and vehicles as well as most painted equipment, e.g. mortars, helmets, PIATS, anti-tank guns, and so on. There is unfortunately no exact ‘out of the bottle’ colour which matches it, so you have to mix it if you want the ‘perfect’ correct colour. Mike Starmer (he of great knowledge and expertise on British paint colours and camouflage schemes) recommends a 50/50 mix of VMC 888 Olive Grey and VMC 924 Russian Uniform: with an empty Vallejo bottle I simply measure and mark at 40mm and 20mm on the bottle, then fill half with one colour, the other half with the other and mix vigorously. This is the mixture I have used here, with lighter highlights to exaggerate the effect for 15mm.
SCC15 Variation II**** (Helmets & painted equipment, 1944-45)
Shadow: VMA 015 Olive Grey & Black
1st Base: VMA 015 Olive Grey
2nd Base: VGC 067 Cayman Green
Highlight: VPA 320 French Tankcrew.
**** The closest ‘out of the bottle’ colour I have found to match SCC15 is VGC 067 Cayman Green (or GW Catachan Green). This is a tad bit darker than the 50/50 mix and also a slight bit greener, but will work pretty well ‘as-is’, especially if you are after a ‘brighter’ look similar to my style. It is far better than the usual 924 Russian Uniform nonsense which isn’t nearly green enough.
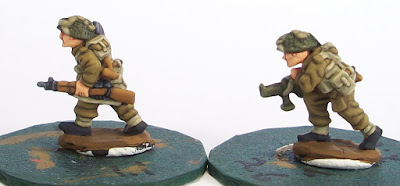
British Infantryman, North West Europe 1944-45

The ‘standard’ late-war figures from Battlefront from the BR702 blister. If one was to be pedantic these figures are in Mk. III ‘turtle’ helmets, issued initially only to the assault divisions, i.e. British 3rd and 50th Infantry Divisions and Canadian 3rd Infantry Division, though many later made their appearance alongside the more usual Mk. II in other formations. Covered in netting and scrim in 15mm there is barely any difference, save the Mk. III is deeper and less of the face visible on the figure.


Lastly, the BD (Battledress) was highlighted with Khaki Grey, finishing the figures.
(Click to expand for double-sized versions)

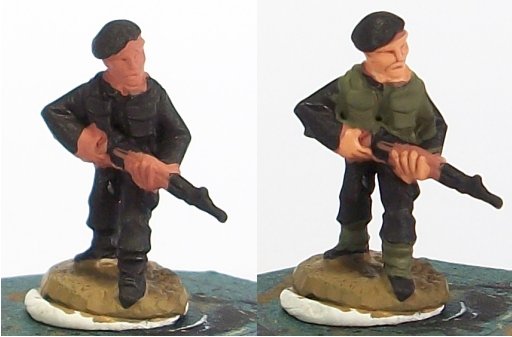
Infantryman in General Service Cap, North West Europe 1944-45
This figure is taken from Battlefront’s BR790 7th Armoured Division Motor/Rifle Platoon, depicting an infantryman in GS cap with a mix of standard and light webbing. For the record, most (if not all) British infantry would have worn helmets in battle (Commandos and Paras somewhat excepted): these figures are a little different from the ordinary helmeted figures and they have a different sculpting style as well with some cracking poses.
Again I start with a black undercoat. VGC Tan for flesh shadow, followed by VGC Dwarf Skintone.

Brown Violet for webbing shadow. US Olive Drab for uniform shadow and for the rifle wood, canteen and entrenching tool where applicable. The hair is similarly painted with USOD for a shadow colour. While generally best avoided on helmeted figures, on others in Berets or GS caps I think that it looks better painted in.

The Webbing was then painted Khaki, wood on the rifle with Flat Earth, the hair with a light brown.

Flesh was then highlighted with Elf Skintone, metal areas and the boots were painted black. The webbing was edge-highlighted with VPA US Tankcrew Highlight. The Battledress was then painted English Uniform, leaving US Olive Drab only in the deepest shadows; more subtle shadows were painted over for now. This is one of the main differences between this figure and the one painted above. These have much more subtle folds: just comparing the trousers will show the gentle folds on the 7th Armoured Infantryman compared to the cartoon-like folds on the trousers of the figure above.

Highlighting now begins in earnest, the wood with VPA New Wood, metal with German Grey followed here by GW Codex Grey. A lighter mix of the light brown was also applied to the hair in vertical lines while the boots were highlighted with P3 Greatcoat Grey (not too visible, but then it’s not meant to be).
The Battledress and GS cap were then highlighted with VPA 317 British Tankcrew. English Uniform was left as a shadow colour in the more subtle folds for detail so as not to over-exaggerate the detail. A simple ring was also left on the GS cap to hint at the shape.
(Click to expand)

Finally, a 4th highlight was applied to emphasise uniform details. A 50/50 mix of VPA 317 British Tankcrew and VPA 321 Highlight British Tankcrew was made and applied to prominent folds and other areas where emphasis was wanted. The badge on the GS was painted GW Boltgun Metal & black as a shadow, then pure Boltgun Metal. Lastly, the leather strap on the GS cap was painted black and then highlighted with German Grey, finishing the figure.
Battledress Uniform Variation II
Shadow: 889 USA Olive Drab
Base: 921 English Uniform
1st Highlight: VPA 317 British Tankcrew
2nd Highlight: 50/50 mix of British Tankcrew and British Tankcrew Highlight
Using Khaki Grey or Green Brown mixed 50/50 with Buff/Dark Sand will be almost identical to the Vallejo Panzer Aces colours above.
I’ll add other info later to this post, in particular some painted examples of the 'Guards Rifle Platoon', really just LW British for NWE in Mk II helmets. The figures do look promising, perhaps even better than the Mediterranean British sculpts. Part 2 will cover painting British infantry in the Mediterranean Theatre. In Part 3 I’ll get to a few other points such as Commando webbing, Berets and painting Denison Airborne Smocks in 15mm.
As always, questions, comments and feedback welcome.
CdlT


Infantryman in General Service Cap, North West Europe 1944-45
This figure is taken from Battlefront’s BR790 7th Armoured Division Motor/Rifle Platoon, depicting an infantryman in GS cap with a mix of standard and light webbing. For the record, most (if not all) British infantry would have worn helmets in battle (Commandos and Paras somewhat excepted): these figures are a little different from the ordinary helmeted figures and they have a different sculpting style as well with some cracking poses.
Again I start with a black undercoat. VGC Tan for flesh shadow, followed by VGC Dwarf Skintone.
Brown Violet for webbing shadow. US Olive Drab for uniform shadow and for the rifle wood, canteen and entrenching tool where applicable. The hair is similarly painted with USOD for a shadow colour. While generally best avoided on helmeted figures, on others in Berets or GS caps I think that it looks better painted in.
The Webbing was then painted Khaki, wood on the rifle with Flat Earth, the hair with a light brown.
Flesh was then highlighted with Elf Skintone, metal areas and the boots were painted black. The webbing was edge-highlighted with VPA US Tankcrew Highlight. The Battledress was then painted English Uniform, leaving US Olive Drab only in the deepest shadows; more subtle shadows were painted over for now. This is one of the main differences between this figure and the one painted above. These have much more subtle folds: just comparing the trousers will show the gentle folds on the 7th Armoured Infantryman compared to the cartoon-like folds on the trousers of the figure above.
The Battledress and GS cap were then highlighted with VPA 317 British Tankcrew. English Uniform was left as a shadow colour in the more subtle folds for detail so as not to over-exaggerate the detail. A simple ring was also left on the GS cap to hint at the shape.
(Click to expand)

Battledress Uniform Variation II
Shadow: 889 USA Olive Drab
Base: 921 English Uniform
1st Highlight: VPA 317 British Tankcrew
2nd Highlight: 50/50 mix of British Tankcrew and British Tankcrew Highlight
Using Khaki Grey or Green Brown mixed 50/50 with Buff/Dark Sand will be almost identical to the Vallejo Panzer Aces colours above.
I’ll add other info later to this post, in particular some painted examples of the 'Guards Rifle Platoon', really just LW British for NWE in Mk II helmets. The figures do look promising, perhaps even better than the Mediterranean British sculpts. Part 2 will cover painting British infantry in the Mediterranean Theatre. In Part 3 I’ll get to a few other points such as Commando webbing, Berets and painting Denison Airborne Smocks in 15mm.
As always, questions, comments and feedback welcome.
CdlT
Great tutorial!
ReplyDeleteThe models look nice and crisp.
Even with the tutorial i won't get them looking as good as you do.
A great tutorial with great results!!
ReplyDeleteCheers
Christopher
Cheers guys ;)
ReplyDeleteCdlT
Terrific post, comprehensive and infinitely helpful. Keep tutorials like this coming.
ReplyDeleteSuperb tutorial, thanks CdlT. The SCC15 mix is particularly useful, been looking for a good match for ages.
ReplyDeleteThanks Ben. I would try out both SCC15 mixes to see which one you prefer though.
ReplyDeleteCdlT
Great post. I've looked at this post 20 or 30 times in the last month as I try to successfully paint some decent looking British Infantry. Your blog and heresy brush have really helped me. Thank you for your great tutorials. They are greatly appreciated. Colour choice is so difficult. Thanks for all of your help.
ReplyDeleteHere is a link to my first test models: http://rustandthecity.blogspot.ca/2013/08/british-heavy-mortar-wip.html
Thanks again!
PS-I added you to my blog roll. I love seeing your work.
Another great tutorial which I will be having a go at.
ReplyDelete