Wednesday 19 December 2018

28mm sMG42 team

Warlord 28mm figs. Not terribly exciting.


Slow going at the moment.

Big 'un, little 'un.


CdlT

Monday 26 November 2018

sMG42 section

Some older figs, now re-based for flexibility.


CdlT

Friday 23 November 2018

MG Bunkers

A couple of MG Pillboxes and MG nests, BF models from their MG Bunkers set. Nice models, and the MG nests come with MG barrels for Vickers, Maxims, MG34 and MG42 which is handy.


CdlT

Friday 9 November 2018

4 RTR Matildas in Caunter

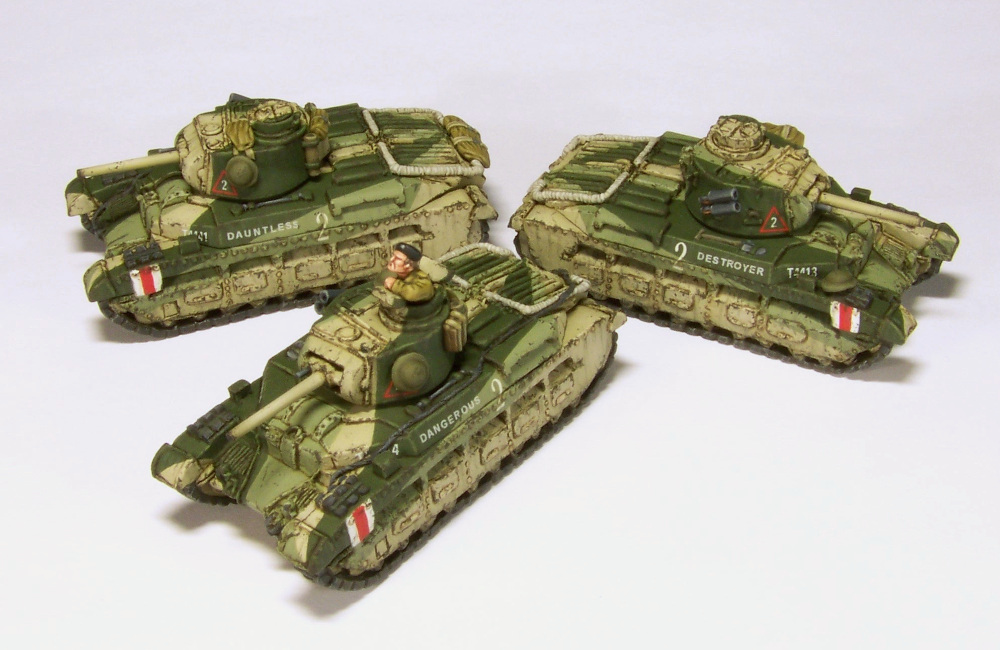
Matilda tanks from 4th Royal Tank Regiment during Operation Battleaxe, now complete. There are more details on the WIP Post regarding stowage, adding details, painting Caunter, etc.

Battlefront metal and resin models. A proper plastic kit would be nice: the Zvezda Matilda is poor, the BF offering is still the best in 15mm.


I've numbered the Troops 1 and 2, though I'm not completely sure it was done this way. Similarly, the names I've added were used by 4th RTR at some point (being 4th RTR...4th letter of alphabet is 'D', so names began with 'D' for the regiment). However, except for DRAKE (which was lost during Op Battleaxe), I 'm not sure if they were used at this time or in these specific troops, etc., but they do look nice and I couldn't very well just do DRAKE and leave the others blank. Serial numbers are fictitious, just added for completion.

1 Troop
DRAKE,
DUCK*
DOLPHIN

2 Troop
DANGEROUS
DAUNTLESS
DESTROYER


 The Squadron signs were done with a red triangle placed ('A' Squadron), with a '1' and '2' placed inside to denote troop number. The names were all spelled individually, letter-by-letter by cutting up a sheet of tank names from Dom's Decals....there were 134 individual decals placed across the six tanks. Madness.

* because the name DUCK just fits the Matilda perfectly. And after spelling out DAUNTLESS, DANGEROUS, etc. all letter-by-letter, DUCK was mercifully short...


Not the best pics but I can't see to get them any better.

CdlT

Thursday 8 November 2018

Fallschirmjäger weapons

A few additional weapons teams to help support the Fallschirmjäger: a PaK36 and extra crew, an MG34 sHMG team, a 50mm light mortar team, a Panzerbüchse 39 anti-tank rifle team and a spare 5-man command group for Battlegroup purposes.


CdlT

Friday 2 November 2018

Op Battleaxe - Game 10: German armoured counterattack

Game 10 saw the German Panzer Gruppe group finally get going and launch a counterattack, driving towards Point 206 and intending to fight whatever they ran into.


As it turned out, the Cruiser regiments had taken Fort Capuzzo and thus the Panzers kept rolling until they struck British forces in Point 206. These, having been repelled during the second attack on Musaid, now had to turn and defend themselves against a much larger DAK armoured and mechanised force.

Starting forces in Flanking Attack: the Germans already pushing hard.

The British received a Kittyhawk in support on Turn 1, though with two small bombs it only managed to pin an 8-Rad. It would knock-out a couple of German trucks later with strafing runs.

British reserves are slow: German are not as a wall of armour floods onto the table.

Some 25-pounders and Matildas arrive to engage, though the shooting is poor. The British players would be plagued by terrible AP Penetration dice the entire game.


German long-range HE fire begins to cause casualties on the gun crews and pins both teams.

The British receive the possibility of more air support but cannot roll the 3+ required to bring it in, twice.

A Matilda falls victim to a Mine Strike counter. The British score several hits in shooting, but none succeed in penetrating the opposing armour though several tanks are pinned.

Despite the pinned armour, the Germans muster sufficient shots to eliminate the 25-pounders (deployed much too far forward).

More hits on German tanks, more failed penetration rolls.
DAK return fire bounces off the heavy Matilda armour repeatedly.

The British draw a fourth Air Support counter and bring on another Kittyhawk, though his bombing is horribly inaccurate and succeeds in eliminating the lead British infantry section with a direct hit!

Kittyhawk strafing proves more successful as several passes see the German soft-skins burning or abandoned.

Finally a tank kill! But the near-most Matilda has been Immobilised by DAK fire and is out of Ammo. The lead 8-Rad has bounced several 2-pounder AP rounds off his front, and wiped-out the British Forward HQ and Supply Truck in return!

The British commanders elect to withdraw their infantry from the table, leaving their objective un-contested...

A Panzer III finally makes a shot count and knocks out a Matilda with a flank hit. The DAK would the go on to secure the last objective with...wait for it...the lead 8-Rad, giving them an "All Objective Secured" victory.
With that, the Germans had re-taken Point 206 and we called the campaign. While the British still have substantial forces, as in real life they lack the strength to push on to Tobruk, to properly destroy the DAK, and must preserve their desert army. Thus, withdrawal.

End game: the British withdraw and Germans lack the fuel to pursue them.


CdlT
Related Posts Plugin for WordPress, Blogger...